


Independence Day is one of my favorite holidays. I have childhood memories of a small town parade, followed by a pancake breakfast, and ending the day with small town fireworks at the park and sparklers in our driveway. So naturally when our daughter was little, I wanted to capture some fun 4th of July memories for her. I never knew making pie would become a tradition, but sometimes the best traditions are ones that aren’t carefully planned. This pie is one of those spontaneous happenings that has become something we must do every single year.
We have been making this pie since 2016. Seven years! The first year we made it, I gave my then 3 year old daughter the leftover pie crust dough to play with while I was making the main pie. But instead of playing, she made her own mini berry pie which has become an annual tradition as well. Every year our daughter reminds me that we have to make this pie along with her mini pies. If the thought of making this seems like too much, I encourage you to give it a try anyway. Berry pies are some of the easiest pies to make!
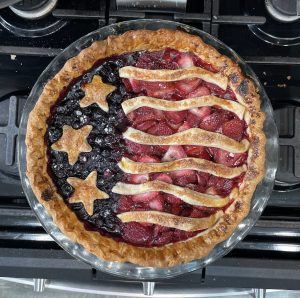
I now present to you our beloved tradition: Old Glory Berry Pie!
PIE CRUST
I use this recipe (you can if you want to (a pie crust tutorial))for my pie crust. After trying multiple pie crusts over the years that were tough or lacking flavor, I found this one, and I have been using it for years. It is flaky, flavorful and super easy and quick to make! Make sure you have a stand mixer. This dough might be difficult to make if you only have a handheld mixer.
If you love the pie crust recipe and also enjoy making other food from scratch, check our her cookbook, The Homemade Pantry. I have worn mine out because it’s so amazing! When you finish making the crust, you need to put it in the fridge for at least an hour. If it is too warm, it will almost melt in the oven when you bake the pie. It will still taste great, but it will look really sad and droopy! This pie crust can be frozen for several months as well!
OLD GLORY BERRY PIE
Once your crust has chilled, you are ready to make Old Glory Berry Pie! Be sure to read the tips below that have helped me over the years:
- Make space in your freezer before you begin the crust. You will need to put the mixer bowl and a measuring cup in there for 10 minutes.
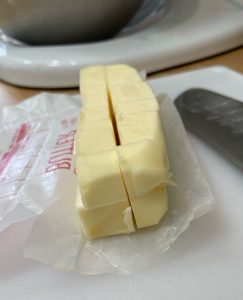
- Wait until the last minute to take the butter sticks out of the fridge. They need to be super cold when you cut them. When cutting, keep them on top of the wrapper. That’s makes it easy to toss them in the bowl when you are done cutting!
- Make your pie crust discs as round as possible before you chill them. This will make it easier to roll out a round crust.
- While the crust is chilling, rinse all the berries, slice & hull the strawberries, gather 2 smaller bowls (1 for the sugar/cornstarch mixture & 1 for mixing the blueberries), 1 large bowl (for mixing the strawberries), a 12 inch piece of foil, a star cookie cutter (1-2 inches wide) and a pizza cutter. You will use the pizza cutter to cut out your flag stripes.
- Make the stripes a little longer than you think they should be. They will shrink as they cook.

- The egg wash tends to make the crust brown quite a bit, and the sugar on top can make it look burnt. If you want a lighter crust, skip the egg wash.
- I never use a crust shield because it flattens my crust design. But it does help to prevent the crust from burning.
- Watch the pie during the last 60 minutes. I typically set the timer every 20 minutes. If you take it out before it’s bubbling all over, the juice will not be thick & the fruit will be a bit crunchy.
Good luck in baking this year, and share your photos with us on social media. Make sure to tag @wacomoms!


